NOTE – VMware Virtual Center 2.5 Update 4 or vCenter 4 is required to use Guest Customizations with Windows 2008.
http://www.vmware.com/support/vi3/doc/vi3_vc25u4_rel_notes.html#whatsnew
Link to the PDF version of this – http://www.divshare.com/download/9496736-c61
For Windows 2008 R2 if you are installing on vSphere 4 without Update 1 or on ESX 3.5 without update 5 set the Template VM OS to Windows 2008 instead of Windows 2008 R2. After a new VM is deployed from the template and guest customization as finished you can set the OS back to Windows 2008 R2.
1. Use an ISO for faster OS setup.
2. Build a new VM that has at least 1 GB RAM and a 20 GB drive.
3. Attach the Windows 2008 ISO to the CD/DVD drive and set it to connect at power on.
4. On the VM Edit Settings window go to the Options tab and in the General section uncheck the Enable logging check box.

5. Go to the Boot Options section and check the box to force going into the BIOS on next boot.

6. Power on the VM and when the setup screen appears go to Advanced, I/O Device Configuration.

7. Disable the Serial and Parallel ports.

8. Go to the Boot menu and set the CD-ROM first in the boot order.

9. Save, exit and install Windows 2008, during the install choose either Standard or Enterprise.
10. On first boot up after install set the Administrator password.
11. Close the “Initial Configuration Tasks” window, after the VMware Tools have been installed we will configure the server.

12. Close the “Server Manager” window.

13. Disconnect the Windows 2008 ISO and set the device type to Client Device.

14. Install VMware Tools, choose Custom install type.

15. Disable the “Shared Folders” driver. This driver can cause issues with profiles unloading properly.

16. Set the “Hardware acceleration” to Full before reboot.

17. After reboot from the VMware Tools install configure the time zone.

18. Configure Networking. Uninstall these networking components. It is best to remove any components not needed to free up resources.
a. QoS Packet Scheduler – Not needed unless you are doing QoS at the Windows layer instead of the L2/L3 switch layer.
b. Link Layer Topology Discovery components – http://en.wikipedia.org/wiki/Link_Layer_Topology_Discovery
19. Leave the IP address set to DHCP unless DHCP isn’t available on the network.
20. Set the computer name to W2K8TEMPALTE

21. Download and install updates. Turn on Windows Updates to download and notify before install.

22. Check for updates and install the latest critical and recommended updates. If the updates fail to download restart and try again.
24. Disable the Windows Firewall.
25. Below is a screen shot of how the server should be configured.
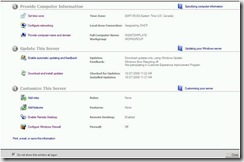
26. Check the box to “Do not show this window at logon” and click Close.
27. When the Server Manager window opens check the box to “Do not show me this console at logon” and close Server Manager.

28. Go to the Taskbar properties and check these boxes.

29. Go to the Start Menu tab and check these boxes.
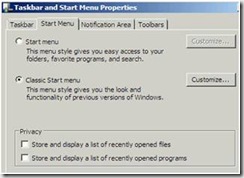
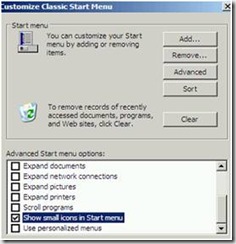
30. Click Customize and check these boxes.

31. Go to the Notification Area tab and check these boxes.

32. Click OK.
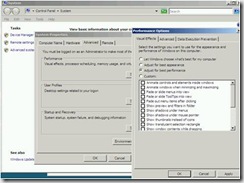
33. Go to Computer properties on the desktop and set the Performance options below.
34. Right-click on the desktop and go to Personalization.

35. Go to Screen Saver and set it to blank.

36. Disable the system screen saver, this is the screen saver that starts when no user is logged into the system. Go to start run and type regedit. Browse to this registry path “HKEY_USERS\.DEFAULT\Control Panel\Desktop” and delete the SCRNSAVE.EXE name.

37. Go to Sounds, when prompted choose No.

38. Set the Sound scheme to No Sounds.

39. Click on Change desktop Icons and uncheck the boxes below.


40. Go to Settings Control Panel. Go to View and choose Status Bar and Details

41. Go to Tools, Folder Options, View tab and check/uncheck these boxes.


42. Apply and apply to folders.
43. Delete the Desktop.ini files on the desktop.

44. Right-click on the desktop and arrange icons by Name.
45. Go to Start, Programs, Administrative Tools, Server Manger and click on Configure IE ESC, set it to off for both Administrators and Users.

46. Go to Internet Explorer properties and set the home page to blank.

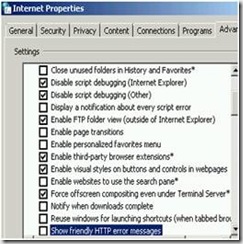
47. Go to the Advanced tab and check/uncheck these boxes.

48. Clear the C:\Users\Administrator\AppData\Local\Temp folder.

49. Go to the properties of the C drive and uncheck the “Index this drive for faster searching” box, click apply and choose Apply changes to drive c:\ only.

50. Go to the cmd prompt and type powercfg.exe -h off to disable hibernation. This command also deletes the hiberfile.sys from C:\

51. Delete the page file and reboot. This is so the C drive can be fully defragmented.

52. After reboot login and delete the pagefile.sys from the C: drive. Defragment the C: drive. After defragmentation completes reconfigure the page file system managed.
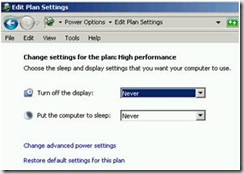
53. Go to Control Panel, Power options and set the Power Plan to High performance.

54. Click the change plan settings and set both options to Never.
55. Stop and disable the Windows Firewall service.
56. Create a new temporary user named ptemp and add the user to the local administrators group.
57. Log out an login as ptemp
58. Go to Computer properties, Advanced system settings, User Profiles, Settings

59. Select Administrator and choose Copy To… Type C:\Users\Default and change Permitted to use to Authenticated Users.
NOTE – FOR WINDOWS 2008 R2 FOLLOW THESE INSTRUCTIONS FOR COPYING THE USER PROFILE. – https://jeremywaldrop.wordpress.com/2009/09/18/how-to-copy-profiles-in-windows-2008-r2-and-windows-7/

60. Logout and login as Administrator, delete the ptemp user profile and user account.
61. Go to C:\Users\Default and delete the old NTUSER.DAT{ files.

63. Shutdown the VM.
64. Convert the VM to a template.
65. Create a Windows 2008 Customization Specification for Windows 2008. You do not need to worry about the sysprep files. In Vista and Windows 2008 sysprep is in C:\Windows\System32\sysprep. When the guest OS type is set to Vista VMware VC knows that the sysprep files are already on the OS.
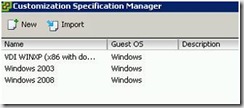
66. When a new VM gets deployed from this template choose your Windows 2008 specification.
67. On first boot up the VM will boot up to a login screen, do not login the VM will reboot automatically after a minute. On the next boot up you should see this screen appear.

68. And this screen. This process may take a few minutes, so be patient.
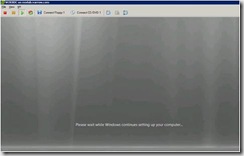
69. The VM will automatically reboot again. Login and shutdown the VM.
71. The VM is now ready for use.


